INFO: Software Cheat Sheets
Illustrator CS5: Making Compound Shapes with Pathfinder Shape Modes
Cheat Sheet 20110928
Cheat Sheet 20110928
• Building a Compound Shape
• Option-clicking the Pathfinder Shape Modes
• Understanding The Different Shape Modes Using Two Circles
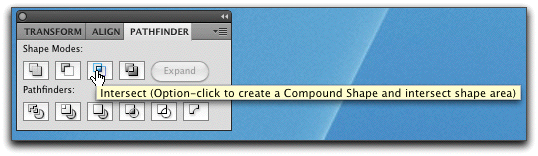
The Pathfinder Panel has four different Shape Modes and a button labeled Expand.
• Unite
• Minus Front
• Intersect
• Exclude
If you find yourself building a multi-Pathed Shape – consider using the Pathfinder Shape Modes to combine your individual Paths into a single more manageable Compound Shape.
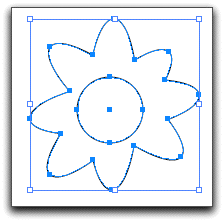
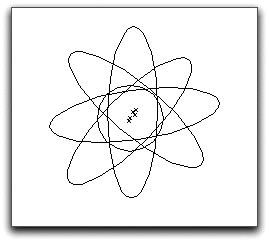
Example: rotated ovals and a circle to make a flower (see image below):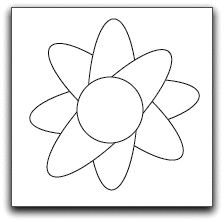
Use the Selection Tool (V) to select all your Paths (see image below):
Shift-select to de-select the Path of the circle (see image below):
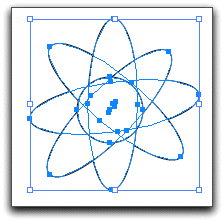
Go to Window - Pathfinder (⇧⌘F9) to open the Pathfinder Panel (see image below):

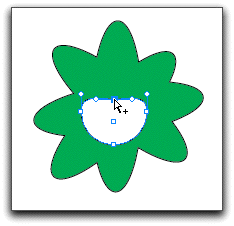
Click Unite and all the oval Paths are united into one boundary Shape – leaving the circle as a separate Path above it (see images below):

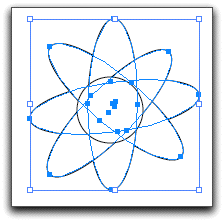
Now, at this point you could just Shift-select the circle and hit Command-8 (⌘8) to make a Compound Path and cut a hole out of the flower (if you wanted a hole, that is). But this time, use Minus Front (see image below):

Minus Front will subtract the Path of a selected Shape that is in front of (above) the Path of another selected Shape that is below – making a hole in the Shape below – and also combining the two into one Shape – making it a Compound Shape.
So, what's the difference? If you have Shift-selected more than one Path at this point – Minus Front will first unite all of them and then subtract that united Path from the Shape below it – see images below.
1. selecting all the ovals (see image below):

2. making them into a Compound Shape (see image below):

3. selecting the inner circles (see image below):

4. making them also into a Compound Shape using Minus Front (see image below):

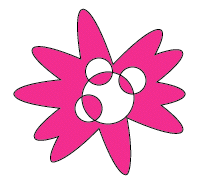
5. which is then automatically subtracted from (punched out of) the flower shape below it (see color image below so you can see the punch-out):

So, if your start with the image below and select, combine and subtract like I did above:

The Command-8 method leaves you with this – which I'm not even going to try to describe (see image below):
The Minus Front method leaves you with this (see image below):

Got it?
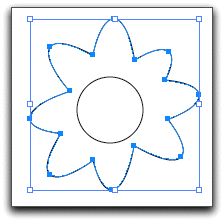
But, getting back to the simple example we're working on – Shift-select the circle (see image below):
Click Minus Front and notice that the Anchor Point in the center has disappeared (see image below):

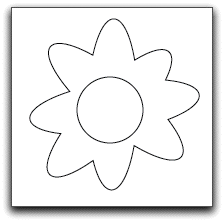
Now you have a single Compound Shape with a hole cut out of the middle (see image below):
(Confused? Do all this and see what's happening in the Layers Panel as you complete each step.)
To show this, the Fill has been changed to red (see image below):

And the Stroke (the thickness of the outline) is changed from 1 point to 3 points (see images below):


And now it has been moved over another Object to show how you can see what's below through the hole (see image below):

Example: rotated ovals and a circle to make a flower (see image below):
Use the Selection Tool (V) to select all your Paths (see image below):
Shift-select to deselect the Path of the circle (see image below):
Option-click on Unite to create a Compound Shape that is live – meaning you can see all the Paths of all the original ovals – which you couldn't if you had not used Option while clicking, as in above (see image below):
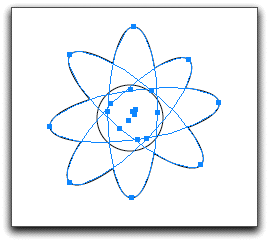
When you deselect your Compound Shape – all the Paths appear to have all been fused together into one Shape (see image below):
But click Command-Y (⌘Y) to show the Outline Form and you can still see all the individual Paths that form your Compound Shape (see image below):
Click Command-Y (⌘Y) again to leave the Outline Form. You can now use the Direct Selection Tool (V) to manipulate the individual Paths and even move them around (see image below):

If you now select the entire Compound Shape with the Selection Tool (V) and then Option-click on the Minus Front Mode – your Compound Shape will be minus your previous Shift-selected circle. (Confused? Do all this and see what's happening in the Layers Panel as you complete each step.) The Fill is now changed to green for better visualization (see image below):

Everything is still editable (see image below):
If you want to change the color – click on the Compound Shape with the Selection Tool (V) and bring Fill to the front (see image below):

Go to the Swatch Panel and change the Fill to whatever color you would like (see image below):

When you want to stop all the editing of the individual Paths of your live Compound Shape – click the Expand button (see images below):


Your Compound Shape can still be edited – but only such as it is now (see image below):

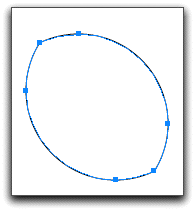
• Create a circle (see image below):

• Select using the Selection Tool (V) and then Option-drag to copy your circle (see image below):


• Select both using the Selection Tool (V) and go through the Shape Modes.
Unite (show them merged) – a slightly pinched watermelon shape (see images below):

Minus Front (show what isn't covered by the other) – a crescent (see images below):

Intersect (show what they share overlapping) – a lemon shape (see images below):
Exclude (show what they don't share overlapping) – two crescent shapes with touching tips – which are filled with blue so you see them better (see images below):

