INFO: Software Cheat Sheets
Illustrator CS6: Shape Tool Basics - Star Tool
Cheat Sheet 20121114
Cheat Sheet 20121114
The Star Tool draws stars.
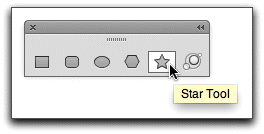
Hold Option while clicking the Rectangle Tool button and you'll click through your Shape Tool choices. Otherwise, just click and hold to see the following tool options (see below):

Release your Mouse on the vertical tearoff bar on the right to make a separate floating panel of the Shape Tools (see below):
If you want to draw numerically: You can select any Shape or Line Tool, click anywhere you want on your artboard, and its dialog box will open up. Then you can just enter your measurements and click OK. Your specified shape/line will then appear on your artboard. (The Star Tool dialog box can be confusing, so go here and learn about it.)
• Click and drag to draw. The Star Tool always draws from the center outward.
• Click the Up and Down arrow keys to increase and decrease the number of points while drawing.
• Holding down the spacebar allows you to freeze and freely move your shape around while still drawing. This works with all the Line and Shape Tools.
• After drawing, you can click once to open the dialog box and see what the settings are for what you've just drawn. Click OK if you want to copy it, otherwise click Cancel.
NOTE: The trick with using any Modifier Key (e.g. Command, Option, etc) is to remember to always release it AFTER you release the Mouse.
• Option lets you align the shoulders that are opposite to each other. (It looks different depending on how many points you have – experiment.)
• Shift will help constrain your star by aligning it to a baseline and also straightening it out.
• Shift-Option lets you align the shoulders that are opposite to each other and constrain your star by aligning it to a baseline.
• Command spikes the corners. The amount of spike increases and decreases while the Command Key is being held and the Mouse is being held and dragged. (Again, it looks different depending on how many points you have – experiment.)

• Radius 1 is the radius of the circle around the tips of the star points.
• Radius 2 is the radius of the circle around the inner core of your star.
• Points is the number of points you have chosen.
Radius 1 (see below):

Radius 2 center circle – (see below):

star with Radii (see below):

star (see below):

To make a copy:
Illustrator will keep drawing the same star you have created until you change it.
Drawing numerically works for all the Shape Tools.
NOTE: If you haven’t drawn anything, the numerals in the dialog box are the default settings. Once you start drawing, the settings will change. The only way to return to the default settings in a dialog box is to quit and relaunch Illustrator. (Or, you can write the settings down before you change them and then manually type them back in as needed.)
Using the Rectangle Tool as an example – position your cursor on your artboard, click and release to open the Rectangle dialog box (see below):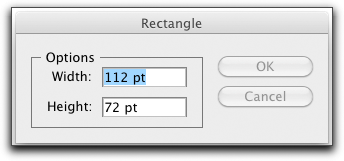
Fill in your desired measurements and click OK. Your measurements will be drawn starting from where you clicked on your artboard and that spot will become the upper left-hand corner of your shape (see below):
If you Option-click to open the Rectangle dialog box – your measurements are drawn from where you clicked and that spot will become the center of your shape (see below):
NOTE: Illustrator acts, in a sense, as a calculator – e.g. fill in inches and it will convert them into points if that is what you have as your document’s default setting.
SPECIAL TRICK: Hold down the Tilde (~) key when using any of these tools and experiment with the shapes you get.