INFO: Software Cheat Sheets
Illustrator CS4/CS5: Pen Tool Basics
Cheat Sheet 20110918
Cheat Sheet 20110918
• Pen Tool Choices
• Smart Guides
• Making a Filled Area with Anchor Points
• Making a Line with Anchor Points
• Finishing a Path without Closing It
• Control Handles
• Anchor Point Types (there are 3)
• Creating Different Types of Anchor Point
• Creating a Closed Circular Path
The Pen Tool does not draw lines – it draws Anchor Points between Paths. The Pen Tool is a connect-the-dots creator.

Hold Option while clicking the Pen Tools button and you'll click through the Pen Tool choices. Otherwise, just click and hold to see the following tool options(see image below):

Release your mouse on the Tearoff bar on the right of your tool options to make a separate floating panel of the Pen Tools (see image below):

Pen Tool with x is ready to begin a new Path (see image below):

Pen Tool with nothing is in the process of making a Path (see image below):

Pen Tool with o is closing a Path (see images below):

Pen Tool (P) draws Anchor Points (see image below):

NOTE: Hold Option to toggle with the Convert Anchor Point Tool (Shift+C).
Pen Tool with + (plus) is an Add Anchor Point Tool (+) and can add an Anchor Point (see image below):

Pen Tool with – (minus) is a Delete Anchor Point Tool (-) and can delete an Anchor Point (see image below):

NOTE: You can also click on an Anchor Point and hit the Delete key but you will also lose the Path segment attached to it.
An inverted v (see image below):

is a Convert Anchor Point Tool (Shift+C) and it allows you to:
• Click and release on a Smooth Point to make a Corner Point.
• Click and drag on a Corner Point to make a Smooth Point.
• Click on the end of a single Control Handle and delete it.
• Click and hold the end of a Control Handle and manipulate it independently.
• Hold Option and then click and drag on any Anchor Point – you will then create a new Path on a new Layer with additional Control Handles on that Anchor Point.
NOTE: If you hover over a Path with your Pen Tool – it will automatically switch to the Add Anchor Point Tool (+). If you hover over an Anchor Point with your Pen Tool – it will automatically switch to the Delete Anchor Point Tool (-).
To turn this behavior OFF – go to Preferences - General and check Disable Auto Add/Delete (see image below):

When Smart Guides are turned on, the distance between your Pen Tool cursor and the last active Anchor Point shows up (see image below) defined in whatever you have as your default general units (to change it – go to Preferences - Units - General).
The example below shows the distance between an Anchor Point and the Pen Tool cursor measured in pixels(see image below):

To turn Smart Guides OFF go to View - Smart Guides (⌘U).
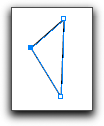
When at least three Anchor Points are made, they will automatically be filled with whatever color is in the Fill square (in this case it's red) – see images below:


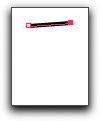
At the top in the Control Panel – change your Fill to None (see image below) and then choose your Stroke size and color.

• Go to Select - Deselect – your Path is then committed to the artboard and you are ready to begin a new Path. (see image below Using the Menu)
• Shift-Command-A (⇧⌘A) commits the Path to the artboard and you are ready to begin a new Path.
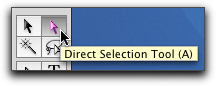
• Command toggles to the Direct Selection Tool (A) – the white arrow. Click anywhere on the artboard outside the Bounding Box. Release Command and you are ready to begin a new Path.
• Command-A (⌘A) selects all the other Paths on your artboard and when you click again – you will have already started a new Path.
• Click A to activate the Direct Selection Tool (A) – then click anywhere on your artboard. (You will have to select the Pen Tool again if you still want to use it.)
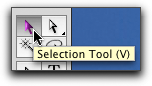
• Click V to activate the Selection Tool (V) and then click anywhere on your artboard outside the Bounding Box. (You will have to select the Pen Tool again if you still want to use it.)
NOTE: If you don't want to see the Bounding Box – go to View - Hide Bounding Box or just click ⇧⌘B.
Using the Menu:

Direct Selection Tool (A) – see image below:
Selection Tool (V) – see image below:
Bounding Box – see image below:

Control Handles enable you to manipulate curves that you've created.
If you click and drag using the Pen Tool, you will create two Control Handles and the center Anchor Point is called a Smooth Point. The black arrow indicates the direction you are dragging the cursor (see images below):


The longer the Control Handles – the more extreme the curve. You can manipulate Control Handles with the Direct Selection Tool (A) – the white arrow (see images below) and the Convert Anchor Point Tool (Shift+C).


• Corner Points have no Control Handles.
• Smooth Points have two Control Handles (see image below).
• Cusp Points (aka Combination Point) have one Control Handle.
• Corner Point – click and release (Hold Shift before clicking and you will be constrained to placing the next Anchor Point at angle increments of 45º.)
Making a Corner Point Path:


• Smooth Point – click and drag – notice that when you click and drag – the cursor changes into a black arrow (see image below). Hold Shift while dragging and you will be constrained to angle increments of 45º for placing the Control Handles.
Making a Smooth Point Path:


• Cusp Point – make a Corner Point and then click on it and drag your cursor to make one Control Handle. Notice that before you click and drag – the cursor has an inverted v next to it (see image below). Hold Shift while dragging and you will be constrained to angle increments of 45º for placing the Control Handle.)
Making a Cusp Point Path:


NOTE: Clicking on any Path with the Direct Selection Tool (A) – the white arrow – will reveal any Control Handles that you can use for manipulating curves.
Always drag in the same direction when making a closed circular Path with the Pen Tool. In this case, the cursor is dragged in a counter-clockwise direction each time. (Notice the black triangle – which indicates the direction the cursor was dragged while making the Control Handles.)
Below: one Smooth Point is drawn

Below: two Smooth Points are drawn

Below: five Smooth Points are drawn

Below: Before closing the circular Path on the original Smooth Point, – hold down Option and then click and drag in the same counter-clockwise direction. (In this case, holding Option creates only one Control Handle in the opposite direction that the cursor was dragged.)
