INFO: Software Cheat Sheets
Illustrator CS4/CS5: New Document Basics
Cheat Sheet 20090212
Cheat Sheet 20090212
Save A New Document Custom Profile
Welcome Screen CS4 - (see below):

Welcome Screen CS5 - (see below):

You can un-check the box at the bottom left and not have it show anymore. You can bring it back by going to Help - Welcome Screen and then re-check the box at the bottom left.
Command-N also starts a new document.

Name it if you can, otherwise wait and name it when you Save.
New Document Profile allows you to change your document to another kind, i.e. print, web, etc.
Number of Artboards gives you more than one artboard so you can try out different designs and see them side-by-side. Artboards are printer independent and can be any size you want them to be, you can decide later how they print. The buttons to the right allow you to grid/arrange your artboards by row or column and the arrow lets you change the direction in which they show. (If it’s easier, you can think of artboards as pages because they function in the same way for output. See Artboard Basics.)
Spacing refers to the spacing between your artboards.
Rows refers to how many rows of artboards.
Size lets you determine standard and custom printing sizes.
Width and Height are just that. You can put in whatever unit of measurement you understand and Illustrator will convert it to whatever you’ve set your document to (i.e. 5in or 5” converts to 360 pt).
Units allows you to choose between:
Points
Picas
Inches
Millimeters
Centimeters
Pixels
Orientation buttons are for tall (portrait) or wide (landscape).
Bleed affects your printing. Basically, if you need to print any colors to the very edge of your artboard boundary – you want your picture to be bigger than the artboard (because if that image has to be physically cut out from the paper it’s printing on and you haven't printed beyond your boundary/trim lines, some white edge will be visible from the cutting process).
So, when it comes to printing, remember that your artboard and trim size boundaries are the same thing – that's where a commercial printer will cut the image. You can change your Bleed options later if needed by going to File - Document Setup (which only affects your active open document).
The Chain button next to Bleed is to turn on or off independent Bleed settings (18 pt is industry standard, some print houses want more).
Color Mode:
• CMYK is Cyan, Magenta, Yellow, Black (Use for print and viewing your actual print colors on your screen to your calibrated printer.)
• RGB is Red, Green, Blue (screen colors only and for the web)
• Remember: RGB colors do not print as you see them on your screen. All printers default to a CMYK color space.
Raster Effects:
(effects that are going to be converted to pixels, i.e. drop shadows)
• High (300 ppi) for commercial/good quality print and photo images
• Medium (150 ppi) for other destinations such as regular home inkjet printing
• Screen (72 ppi) for web
• Remember: If you want to change your Raster Effects settings right before printing – cancel out of the print dialog. Then, go back to your document and go to Effect - Document Raster Effects Settings. 150 ppi is fine for drop shadows.
Preview Mode:
(this can be switched at any time)
• Default shows vector artwork at its highest resolution (use for print).
• Pixel (use for web)
• Overprint shows how your various colors are going to overprint each other and allows you to view separations (use for commercial pre-press).
Saving - screen two (see below):

• Decide if you want to send only certain artboards. (Remember: Only CS4 has multiple artboards, so if you’re sending the file to someone who has an older version of Illustrator, be certain to specify that too during your Save.)
• If you un-check Create PDF Compatible File, your file size will be smaller but then only Illustrator can read it
• You want to Embed ICC Profiles (these are your colors).
• You want to Use Compression (it’s loss-less).
Fill in all your specifics, Name it and then Save it to:
Username/Library/Application Support/Adobe/Adobe Illustrator CS4/en_US/New Document Profiles
When you open Illustrator again the profile you just named and saved will show up on the Welcome Screen as a choice just below Basic RGB Document and also be a choice in the New Document Profile drop-down menu in the New Document dialog window (shown below).
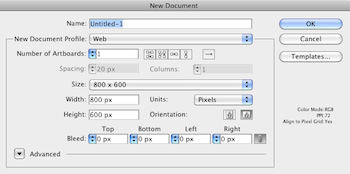
Size is now referring to screen resolution. You can set your own (ex: banner size is 720 x 90 px).
Color Mode: will default have a color mode of RGB (Red, Green, Blue).
Raster Effects: will default to 72 ppi (pixels per inch).
Preview Mode: will be default, but you can switch to Pixel Preview Mode for a more accurate view at any time.
(in CS5 only) You can check the box to Align New Objects to Pixel Grid to snap your objects to the grid so that they are clean and sharp-looking on any device (see below):

Size is now referring to digital video (dv) resolution.
Don't get me started.